-
Recent Posts
Recent Comments
Tags
architecture art autumn boats christmas colors Cooking DIY everything else Family Farm Features flowers food garden gardening HAIRSTYLES holidays Kids knit Knitting Knitting & Spinning Lighthouses Martha's Vineyard Massachusetts Memories New England New Jersey New York New York City Oak Bluffs Pets photo a day photo a day challenge Photographs postaweek quilting Seasons Sewing sky Spinning Uncategorized water Wordpress yarnArchives
- October 2025 (1)
- August 2025 (1)
- July 2025 (1)
- June 2025 (1)
- May 2025 (1)
- April 2025 (1)
- March 2025 (3)
- February 2025 (2)
- December 2024 (1)
- November 2024 (1)
- October 2024 (1)
- September 2024 (1)
- August 2024 (2)
- June 2024 (3)
- May 2024 (1)
- April 2024 (1)
- March 2024 (2)
- February 2024 (1)
- December 2023 (4)
- November 2023 (3)
- October 2023 (1)
- September 2023 (3)
- August 2023 (3)
- July 2023 (4)
- June 2023 (1)
- May 2023 (2)
- April 2023 (3)
- March 2023 (3)
- February 2023 (2)
- January 2023 (5)
- December 2022 (4)
- November 2022 (2)
- October 2022 (2)
- September 2022 (1)
- August 2022 (1)
- July 2022 (5)
- June 2022 (5)
- May 2022 (5)
- April 2022 (2)
- March 2022 (2)
- February 2022 (1)
- January 2022 (2)
- December 2021 (2)
- November 2021 (2)
- October 2021 (5)
- September 2021 (6)
- August 2021 (6)
- July 2021 (3)
- June 2021 (4)
- May 2021 (4)
- April 2021 (1)
- March 2021 (6)
- February 2021 (7)
- January 2021 (6)
- December 2020 (4)
- November 2020 (6)
- October 2020 (3)
- September 2020 (4)
- August 2020 (3)
- July 2020 (6)
- June 2020 (6)
- May 2020 (4)
- April 2020 (5)
- March 2020 (3)
- February 2020 (2)
- December 2019 (1)
- November 2019 (4)
- October 2019 (8)
- September 2019 (4)
- August 2019 (11)
- July 2019 (8)
- June 2019 (29)
- May 2019 (22)
- April 2019 (18)
- March 2019 (26)
- February 2019 (21)
- January 2019 (58)
- December 2018 (207)
- November 2018 (108)
- October 2018 (34)
- September 2018 (31)
- August 2018 (35)
- July 2018 (41)
- June 2018 (110)
- May 2018 (60)
- April 2018 (25)
- March 2018 (23)
- February 2018 (10)
- January 2018 (17)
- December 2017 (22)
- November 2017 (15)
- October 2017 (32)
- September 2017 (16)
- August 2017 (17)
- July 2017 (19)
- June 2017 (12)
- May 2017 (14)
- April 2017 (12)
- March 2017 (9)
- February 2017 (23)
- January 2017 (20)
- December 2016 (43)
- November 2016 (31)
- October 2016 (20)
- September 2016 (28)
- August 2016 (28)
- July 2016 (40)
- June 2016 (81)
- May 2016 (38)
- April 2016 (39)
- March 2016 (28)
- February 2016 (31)
- January 2016 (37)
- December 2015 (43)
- November 2015 (44)
- October 2015 (56)
- September 2015 (39)
- August 2015 (36)
- July 2015 (42)
- June 2015 (46)
- May 2015 (43)
- April 2015 (57)
- March 2015 (58)
- February 2015 (56)
- January 2015 (39)
- December 2014 (60)
- November 2014 (73)
- October 2014 (67)
- September 2014 (63)
- August 2014 (80)
- July 2014 (81)
- June 2014 (85)
- May 2014 (86)
- April 2014 (87)
- March 2014 (93)
- February 2014 (89)
- January 2014 (89)
- December 2013 (107)
- November 2013 (89)
- October 2013 (79)
- September 2013 (90)
- August 2013 (94)
- July 2013 (112)
- June 2013 (104)
- May 2013 (151)
- April 2013 (139)
- March 2013 (140)
- February 2013 (119)
- January 2013 (138)
- December 2012 (136)
- November 2012 (175)
- October 2012 (154)
- September 2012 (158)
- August 2012 (181)
- July 2012 (194)
- June 2012 (171)
- May 2012 (204)
- April 2012 (203)
- March 2012 (214)
- February 2012 (118)
- January 2012 (52)
- December 2011 (37)
- November 2011 (27)
- October 2011 (26)
- September 2011 (23)
- August 2011 (8)
- July 2011 (12)
- June 2011 (11)
- May 2011 (12)
- April 2011 (9)
- March 2011 (16)
- February 2011 (11)
- January 2011 (13)
- November 2010 (6)
- October 2010 (12)
- September 2010 (11)
- August 2010 (15)
- July 2010 (15)
- June 2010 (4)
- May 2010 (5)
- April 2010 (3)
- March 2010 (3)
- February 2010 (7)
- January 2010 (11)
- December 2009 (11)
- November 2009 (14)
- October 2009 (17)
- September 2009 (9)
- August 2009 (8)
- July 2009 (1)
- June 2009 (5)
- May 2009 (15)
- April 2009 (5)
- March 2009 (4)
- January 2009 (2)
- December 2008 (1)
- November 2008 (1)
- September 2008 (2)
- August 2008 (1)
Contributors
- Cloth-n-Clay
- Adri Makes a Thing or Two
- Ambersambry Blog
- Booking Through Thursday
- Caroline Fryar
- Cherished Moments
- chez farm
- Dave and Lisa’s Backyard
- Dragan's Project Page
- Fyberspace's Blog
- Gilead Goats
- Grandmatutu musings
- It’s MY Life! (Diary of a Mom, Pet Owner and Fiber Artist)
- Knit Mainea!
- Knitting Scholar
- librarysarie
- maggistitches
- Maltese Parakeet
- Marla Holt
- Merry Magpie Farm
- Midwest Yarn
- MV Obsession
- Nishikot: Crafty things from Sheeri
- Punctuality Rules!
- Ramble the Travelling Ram
- Rebecca’s Pocket
- Red Dirt Knitter
- Retired, but not Retiring
- Rhymes with Flurms
- Stoneview
- Sundaybee's Blog
- Sunset Cat Designs
- Thoughts of the Day
- Through Jersey Eyes
Meta
Tag Archives: DIY
Baby Quilt for Emily
Hello Constant Reader,
Although the half-square triangles that make up the big diamond motif were slightly larger than the 4x4 squares, I made it work. And, I'm pretty happy with the way it turned out!
This project is actually still a WIP. The main quilting is done, but we (baby mama, her sister-in-law, and I) plan on filling in the open spaces with some hand-quilting, embroidery, and embellishing. I just wanted to share with you my latest nearly finished project because it's my first totally improvised quilt!
I used Bella Solids pre-cut 5" squares and a charm pack that was a gift to me. If anyone can identify it, that would be great. I couldn't find the specific collection. The backing is an all-over floral print from Free Spirit, a collection called Summersault, and the fabric is "pinwheels" in apricot.
I'm hoping my friend's baby likes it as much as I do!
Coming Soon…
The final piece of the Squishy Series (although a hoodie add-on and/or sleeves may be in order)...
Currently in tech-edit/testing, but coming soon!
Currently in tech-edit/testing, but coming soon!
Comments Off on Coming Soon…
Tagged collaboration, design, DIY, knit
Yay! Finished Brown Quilt
This is my first large scale quilt. Ever! I finished it. Not just finished the top, mind you, the whole thing is quilted and even washed. I'm over the moon as you can tell, and I learned heaps of things throughout this project.
Here it is!
Firstly, the biggest thing I learned is about basting the quilt-sandwich... If you're going to do one method, make sure you see it through in its entirety. I kind of pick and chose, and ended up with some major snafus in the center of my quilt. Here's my mistake... I was doing the Ann Peterson method from "quilting a large quilt on a small machine" from Craftsy where she sews around the outside of the border first and then stitches in the ditches afterward. BUT she uses adhesive spray for added support when basting. I chose pins... and not very many of them. By the time I had realized my mistake, I was in too deep to seam rip. I couldn't bear to do it. So, I forged on ahead and only ripped the absolutely necessary areas.
So, lesson learned... Next time, I will quilt medallion-style so I can evenly space out my pins and not have any crazy shifting of my fabric.
I used pre-cuts for the front and donated backing fabric. A very kind lady sent me the backing fabric when I purchased thread from her. I couldn't believe how perfectly it went with the brown. Thank you, kind lady!!
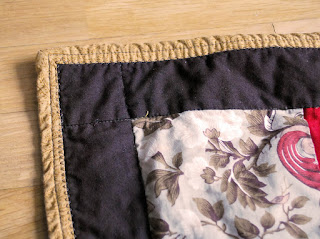
I used the backing fabric as the final binding and found zig-zagging to be a very nice way of getting a really flat look to the binding. I really like it after washing, too! Despite the ridiculous amount of shifting and scrunching at the center, I consider it a success. I have a blanket, and we needed one... it's still quite cold in these parts.
What are you all working on?
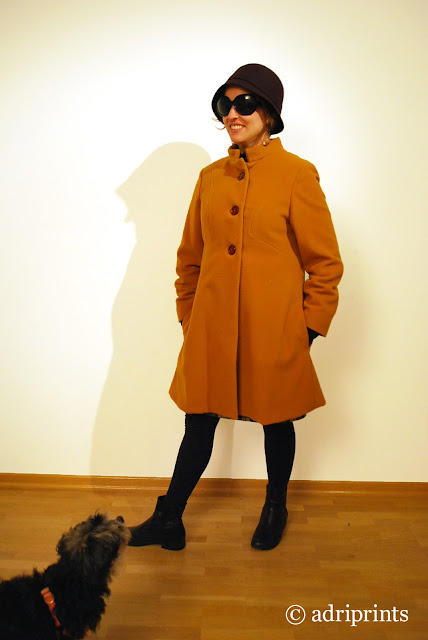
The Edie Coat, Vogue 7239 (1967)
As originally posted in The Sew Weekly for the 1960's Challenge..
The Facts
⁃ Fabric: 3m wool, 2m lining, interfacing
⁃ Pattern: Vogue 7239
⁃ Year: 1967
⁃ Notions: 3 buttons
⁃ Time to complete: several weeks in October
⁃ First worn: end of October
⁃ Wear again? Since it's been cold, I haven't stopped wearing it!
⁃ Total price: ~30EUR = 7EUR/m for wool (21EUR), $2.50/m China Silk Poly for lining (5 EUR), interfacing, thread, etc...
Pattern Story - I won this pattern from a giveaway on the Seamless Blog, and will give it away once this is published on the Sew Weekly. Look out for a blog post from me if you're interested in entering the giveaway.
I loved the pattern. There is one funny bit around the neckline, and the finishing of the neck band, but other from that it was smooth sailing. I had help from the Threads book on tailoring, and my Claire Schaeffer's fabric guide book. I was set. I didn't have to change a thing in the pattern except length of the sleeves and hem. That was nice!
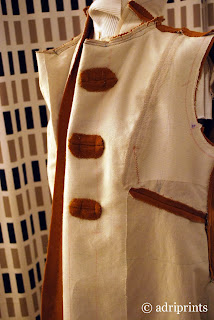
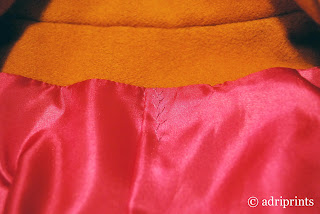
Here are some of the inner workings...
bound buttonholes
feather stitching, fuchsia lining
groovy pocket fabric
I had a lot of fun working on this coat and once it was finished, I realized this one was a true keeper. I've been wearing it regularly ever since. The coat reminds me of Edie Sedgwick for some reason. Something about my haircut these days, perhaps?
Iris Pullover
I'm glad to finally be sewing again! Here's a quick project I made in the in-between times. Knitwear design is still taking the priority spot on my agenda, but hopefully I'll have some pretty samples to show for it in the near future!
In the meantime, here's the Iris Pullover from Schnittchen® - einfach nähe...
Schnittchen's downloadable patterns are much in the style of Burda and Knipmode in that you print out a large sheet with multiple sizes, and then you mark and trace just your size. The patterns are unlike Burda/Knipmode in that they actually include seam allowances! Woot!
For this kind of oversized garment it was nice to have the seam allowances already done... makes for quick, quick, quick sewing when it's just ~1/4" seam allowance (width of a sewing foot) and go go go! It took me just a few hours to sew, and you don't need an overlocker (though it would make things even faster!) just a straight stitch and a zig-zag stitch.
So here it is! My Iris Pullover...
This jersey knit fabric was lovely to work with albeit on the thin side. I am definitely going to make another one when I can get my hands on some sweatshirt fabric at a reasonable price. Suggestions are welcome for sweatshirt fabric resources in the EU!
The Facts
⁃ Fabric: 1.5m x 1.5m striped knit jersey from TST-Stoffen (at Stoffmarkt Holland fabric market)
⁃ Fabric: 1.5m x 1.5m striped knit jersey from TST-Stoffen (at Stoffmarkt Holland fabric market)
⁃ Pattern: Iris Pullover from Schnittchen (has link to photo instructions)
Also, check out some of the free patterns on the site here.
⁃ Year: 2012?
⁃ Notions: none
⁃ Time to complete: 4 hours
⁃ First worn: Nov. 16, 2012
⁃ Wear again? YES, I love it. It's really comfy.
⁃ Total price: 5 EUR for the fabric
⁃ Notions: none
⁃ Time to complete: 4 hours
⁃ First worn: Nov. 16, 2012
⁃ Wear again? YES, I love it. It's really comfy.
⁃ Total price: 5 EUR for the fabric
I love the way this pattern turned out. I love the over-long sleeves so I can hide my hands inside the cuffs, and the long body so it covers everything.
Possible Mods for next time
It's too bad I didn't have a little more of the fabric, otherwise I'd have made it with the hoodie. (Instead, with the little extra I had left, I'll be making some undies.)
I think I may also include a thumb gusset so I can stick my thumbs in the cuff and use the cuffs like pseudo-gloves. Why not?
Overall Review
The Iris Pullover pattern is do-able for beginners with a machine that has a zigzag and a straight stitch. Only special tool needed was a needle for elastics. I used a Schmetz Stretch 75/11 needle.
Happy Sewing!
Sew Weekly: Apron Challenge!
Comments Off on Sew Weekly: Apron Challenge!
Tagged DIY, patterns, Sewing, SewWeekly Challenge


