Monthly Archives: March 2014

New Post Coming Soon!

The past week has been a rough one. Crazy busy with upcoming events (like our shearing party this Saturday), a mountain of work and an unexpected personnel change (Lauria will be leaving us this Friday). Add a stomach virus and the early stages of a very big project and you have the perfect storm.

Something has to give, and this week, that something will be the blog. Posting will be light while we get staffed back up and get some of these projects off our plates!


Out Like A Lamb …

It used to be a lamb :)

100_6226

(by Joan)

mvobsession.com


Sewing Victory!

I decided that since the temperature wasn’t going to get very high and it was going to rain all weekend I could justify dedicating the entire weekend to sewing.

I’m so glad I did – it’s been glorious!

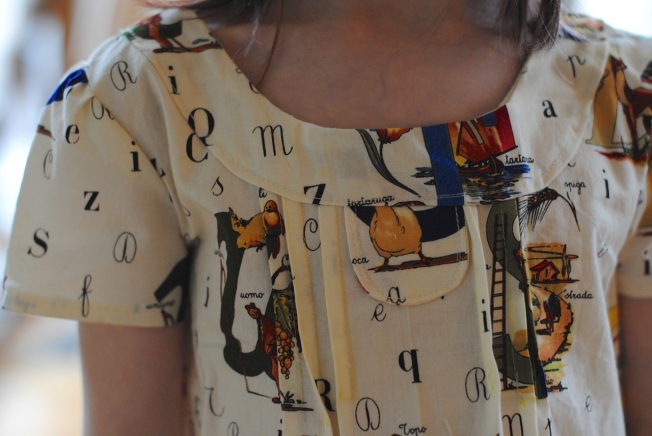
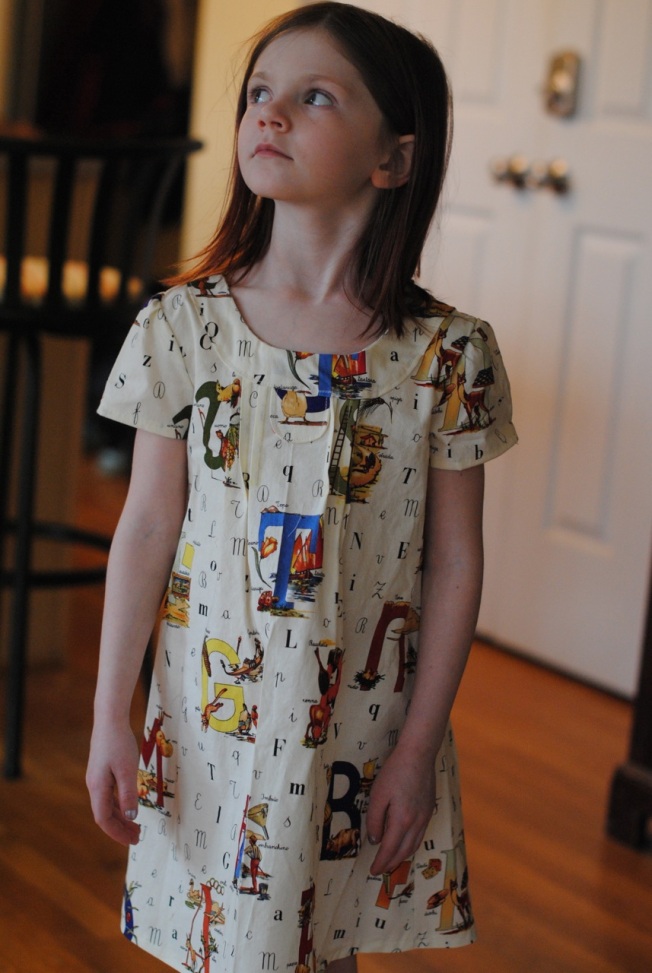
The first project I worked on was a dress I had started last summer for Oona and figured I had better finish before it was too small!

03.30.14a

The pattern is Oliver & S’s “Family Reunion”.

I don’t remember where the fabric is from, unfortunately.  I bought it quite awhile ago.

03.30.14b

The only modifications I made to the pattern are that I did not add little decorative  buttons on the front tab , and I did not topstitch the hem.

03.30.14c

I had to fight my sewing machine to get the automatic buttonhole feature working properly.  It took two needle changes, a cleaning out of the bobbin casing (lots of lint!) and a change of thread.  Sometimes it’s just fussy things like that.

The buttons on this are vintage ones that were my grandmother’s.  They match perfectly, don’t they?

03.30.14d

I just adore this fabric!

03.30.14e

03.30.14f

She wore it all day and wouldn’t even remove it for bedtime.

I’ve moved on to my next projects: The Lady Skater Dress in a red cotton and The Renfrew shirt in a blue Ponte de Roma knit (its a poly/rayon blend I normally wouldn’t go for, but it’s very nice and drapey.

I have plenty of Harney and Sons tea to fortify me (and Neve made chocolate chip cookies), so hopefully I will have progress photos soon!


Tagged: Sewing

Wild West Vol 1, Lace 1: Pinyon Jay Cowl

SUNSET CAT-58The Pinyon Jay cowl is the second cowl pattern in The Wild West: Patterns Inspired by the Flora, Fauna, Geology & History of Arizona, vol 1: Lace 1.

I designed the sister pattern to this, the Pinyon Jay Crescent (to be released in LACE 2) first, spring/summer 2013, and really loved how I blended the edging into the traditional stitch pattern.  I went ahead and designed the cowl, adding a little bit of purl contrast to the top edge.

I had originally wanted to do this just in Shibui Silk Cloud, but ended up doing the version in the Baby Alpaca first.  I also had some Knit Picks Stroll in Agate Heather (a color I adore, that fits into the color palette of the collection), so ending up doing 3 different versions, with different beaded options.

ROMANCE
This lovely cowl is offered in three weights, with or without beads. I chose the beading colors on the DK version to evoke the colors of the Pinyon Jay.

PATTERN NOTES
Laceweight is shown without beads. To include beads, simply place beads as shown in the Fingering and DK Weight chart.

SUNSET CAT-62I love this feathery lace stitch pattern, and explore it further in the forthcoming LACE 2.

FINISHED MEASUREMENTS
Height: 9¾ (10¼, 10¼)in / 24.5 (26, 26)cm
Top Circumference: 23¼ (25, 28)in / 59 (63, 71)cm

YARN
Lace: Shibui Silk Cloud, 60% kid mohair, 40% silk, (330 yd / 25g), 1 skein, shown in Watermelon.
Fingering: Knit Picks Stroll Sock Yarn, 75% Superwash Merino, 25% Nylon, (231 yd / 50g), 2 balls, shown in Agate Heather.
DK: Shibui Baby Alpaca DK, 100% baby alpaca, (255 yd / 100g), 1 skein, shown in Ivory.

NEEDLES
Lace: US1½ / 2.5mm needles or size to obtain gauge
Fingering: US3 / 3¼mm needles or size to obtain gauge
DK: US6 / 4mm needles or size to obtain gauge

GAUGE
Lace: 22 sts and 40 rnds = 4in / 10 cm in St st.
Fingering: 18 sts and 32 rnds = 4in / 10 cm in St st.
DK: 16 sts and 32 rnds = 4in / 10 cm in St st.

NOTIONS
Miyuki see beads size 6/0 in the following colors. I recommend getting more than this minimum to account for loss, breakage, and defects.

For 2 color version
(203) beads, shown in 4511 Black Picasso
(56) beads, shown in 412FR Matte Op Turquoise Green Ab

For 1 color version
(259) beads, shown in blend of 412FR Matte Op Turquoise Green Ab and 412F Op Turquoise Green

(1) stitch marker for beginning of round, yarn needle

crochet hook or dental floss for bead placement (I use a 0.75mm hook)
yarn needle

SKILLS
knitting in the round, lace, reading charts, beading (directions given)

SUNSET CAT-57

Making your own lip balm

When talking with Julie about how I have an incredibly difficult time finding lip balm that I’m not allergic to (due to added flavors / scents and other chemicals), she said that she’d gladly make some for me and that it only took about 5 minutes to make. She was not wrong!

Ingredients:
15g almond oil
15g shea butter
8g beeswax
15 drops vitamin E

Supplies:5-10 lip balm tubes or tins
digital kitchen scale
microwave-safe pouring container (glass measuring cup)
something to stir with

Julie purchases her supplies at Bramble Berry or Mountain Rose Herbs.

This picture shows honey. We tried making lip balm with honey, but it wasn’t working and after doing some research, we found that the only way to make honey mix is to use an emulsifier wax, so skip it on your first try. We’ll be experimenting again. You can certainly flavor / scent with something else – mint would be delicious!

017

You want to set up your lip balm tubes before you do anything. Check to make sure that they all turn and are in their low position and put them as close together as you can to reduce spilling while pouring.

Measuring by weight, put the Sweet Almond Oil, Shea Butter, and Beeswax in the glass measuring cup.

009

025

Microwave in ten second increments until the ingredients are all melted. You don’t want the ingredients to super heat, so you really do need to stop it every ten seconds.

033

Once everything looks fairly melted, mix in the Vitamin E Oil. We did this step backward and added it before we microwaved. oops. Vitamin E Oil (and any essential oils or honey you might choose to use) are not heat stable.

Julie knows how much 15 drops is and because Vitamin E Oil is so thick, much of it is lost in the measuring process, so Julie eyeballed it.

030

031

Stir until everything is well blended. (You can see how the honey just sat at the bottom despite Julie’s best stirring efforts.)

037

Pour the liquid into the ready lip balm containers. It cools VERY quickly. You can see how it’s turning cloudy at the edges already. (And you can see the honey at the bottom. It stayed in the measuring cup while pouring.)

041

We thought that this recipe would make 10 lip balms, but it made just over 5. Your mileage may vary. This is still plenty to have them stashed all over. Or you could just put them all in your purse like Susie.

043

Let the lip balms cool. It won’t take long!

045

Cap them off and you have great lip balm. I can’t tell you how awesome it is to be able to put this on my lips and not have any allergy issues like I do with commercial lip balms. I know everything that went into it and they’re simple ingredients. I’m excited to try adding pigments so I can make my own tinted lip balm! The initial supplies can be rather expensive, but you use very little of them per batch and many of these products overlap in other beauty products, so it may become well-worth it if you’re interested in making your own.

This lip balm is a little softer than what you might be used to and may not be for you if you like to keep it in your pocket.

If you really want to get creative (or give these for gifts!), you can print your own labels.

Lip Balm Label3

I’ve created a 1.8×1.8 label that you can you download here. I’ve not used this website before, it looks like a great place to get waterproof sticker paper to print on!


Black And White Ruins …

100_8891

100_8888

- by Joan -

(mvobsession.com)


MK Tutorial: The Garter Bar

Ah yes, today we learn a little bit about the garter bar- that tool which gave me nightmares until it made my knitting machine dreams come true!

I have an old-fashioned garter bar that I purchased on e-bay a few months back after not realizing that there was a difference between transfer combs and garter bars.  You live, you learn. This kit is a couple of decades old, but is in pristine condition.  Sadly, it came with sparse instructions in Japanese and German.  I do speak and read German, but the technical nature of the writing made it a bit tough.  So, after a bit of internet researching, deciphering the 1970's mimeographed illustrations and instructions, and a bit of trial and error, I photographed my process to share with you all.  It's also here to remind me how to use it in case I need a mental refresher.  Here goes...


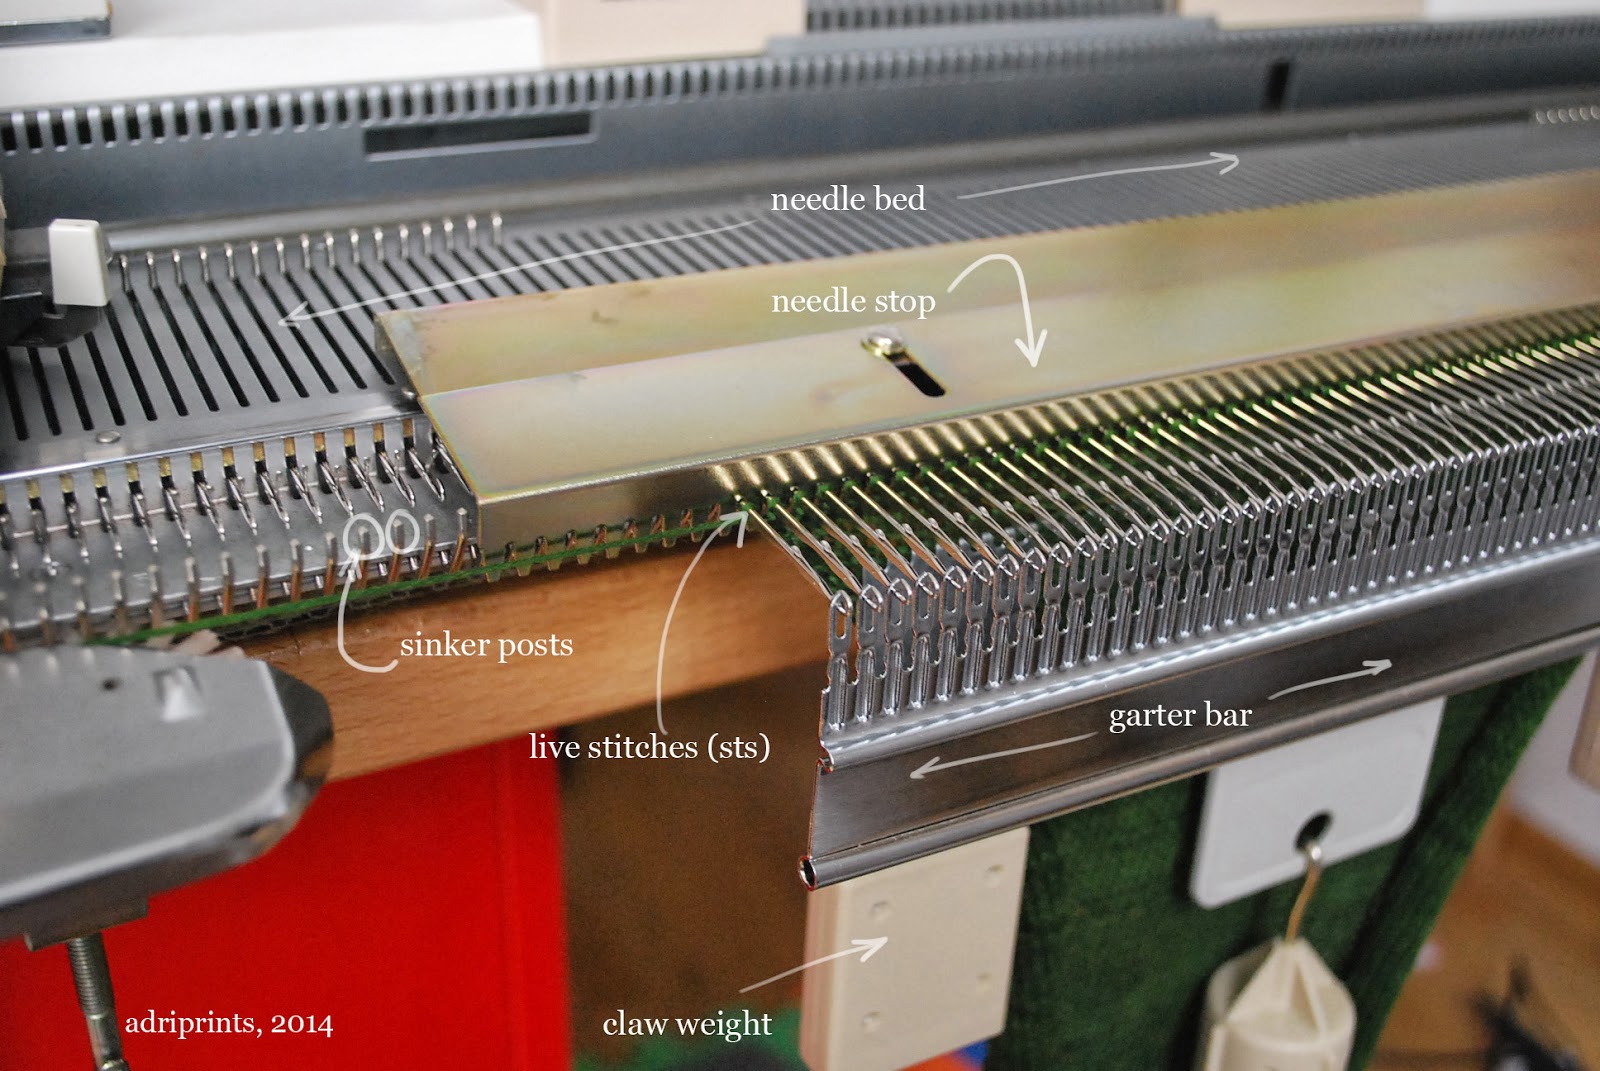
Note: I'm using an Empisal Knitmaster 324 and a Brother Garter Bar so the conventions of my machine and garter bar may not be the same for yours.  I've used terms that make sense to me to describe parts of the garter bar, but they are not official terminology by any means.

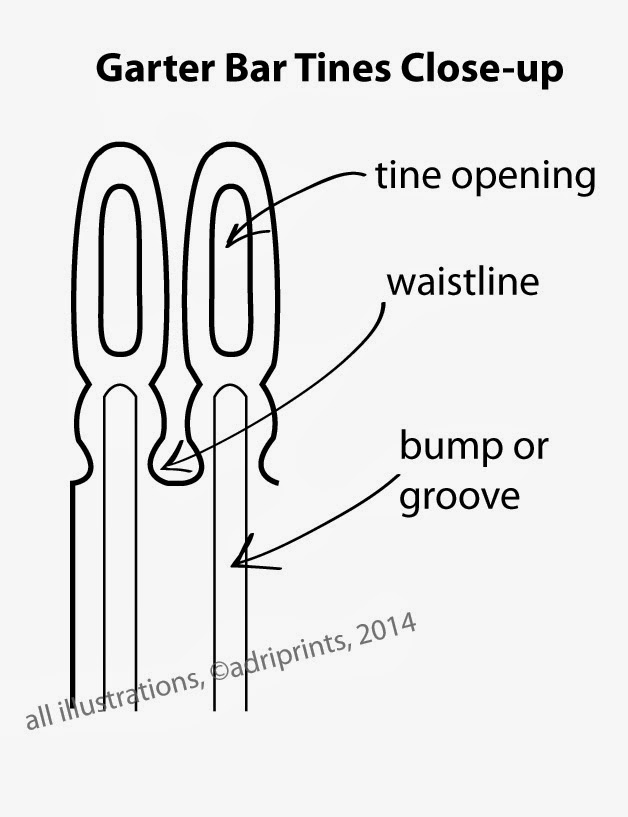
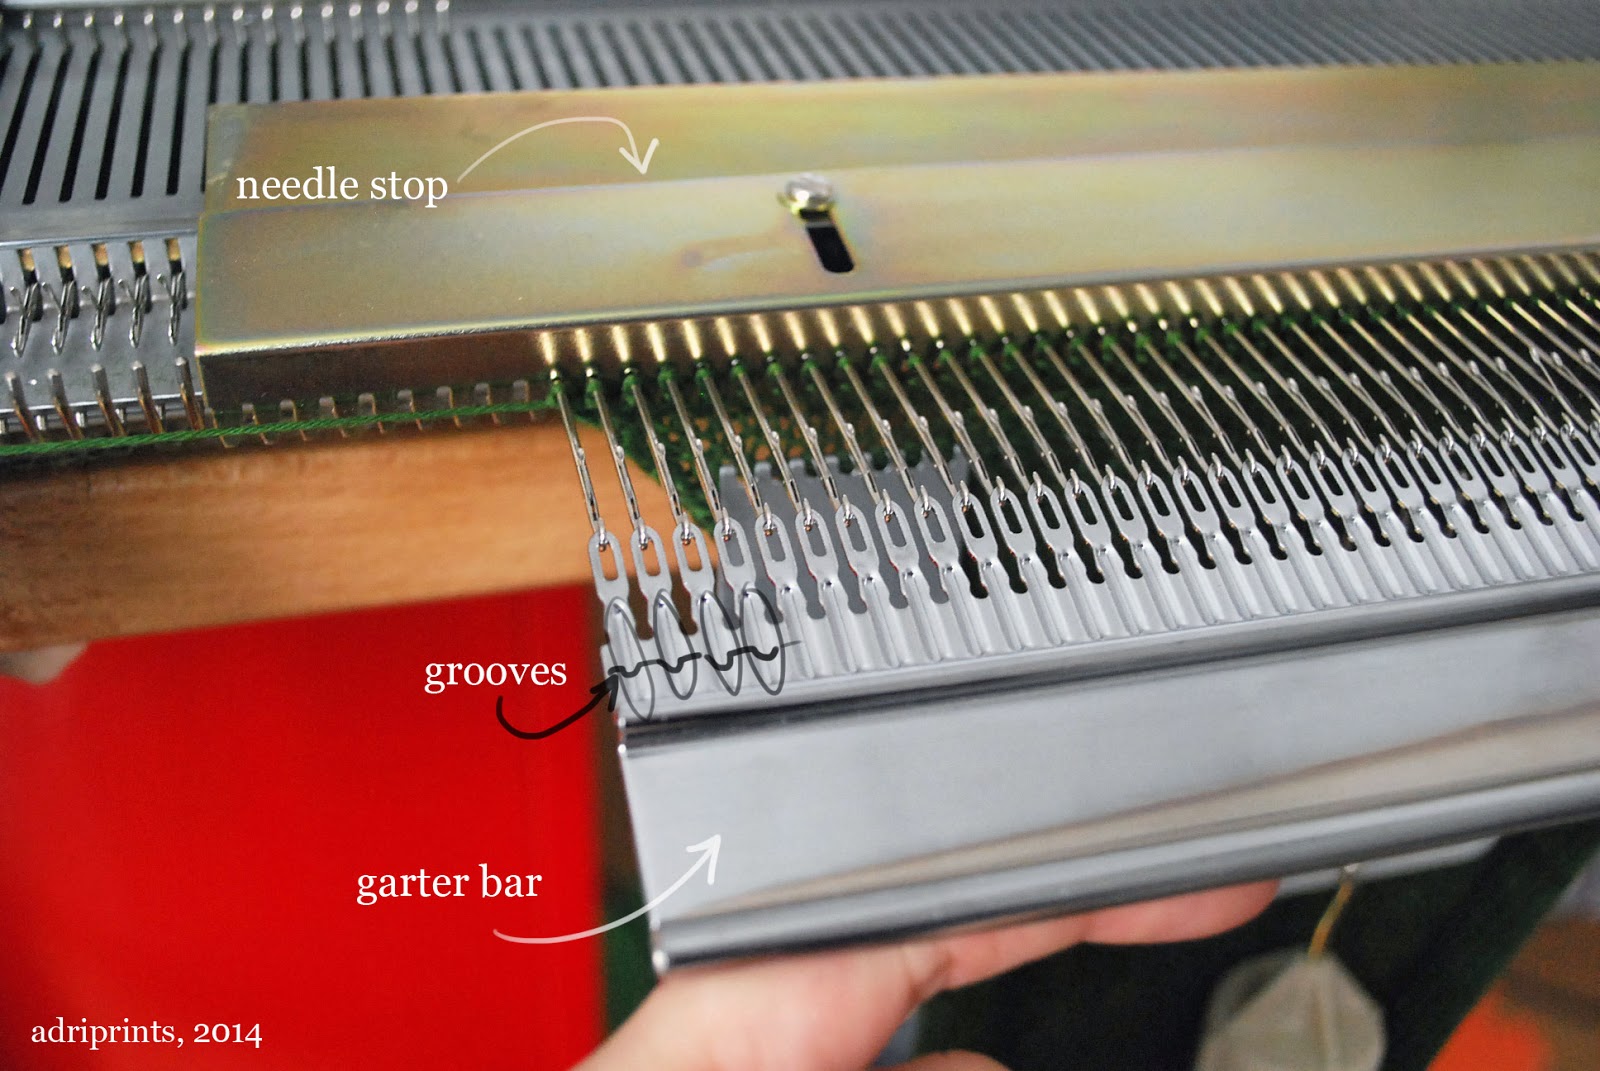
The garter bar has two sides: one side has all bumps, the other side has all grooves.

1. Place working needles in D position with sts past the needle bed's sinker posts.  Place the needle stop over the working needles, over the sinker posts, but behind the sts of the work. Open all the latches of the working needles.  Place the garter bar onto the needle hooks with the groove/ditch side up


2. Lift the garter bar so it's parallel with the working needles.


3. Use the live sts to close each needle's latch over each garter bar tine.


4.  Slide the live sts over the garter bar tines, past the "waist line" of each tine.


5. Release the yarn from the carriage, and use a clothespin to secure it to the garter bar.
Set the carriage so the Russel Levers do NOT knit the needles in D position.
Remove the claw weights from the work, and then remove the garter bar from the needles with live sts still attached.
Next, remove the needle stop from the needle bed and push the carriage to the opposite side. Breathe.


7. Replace the needle stop over the working needles.  Turn the garter bar bump side up with the knitting work on top.


8. Open all the latches.  Make sure the garter bar is parallel with the working needles, and place the openings of each tine over the latches.  Remove clothespin. All the sts must be as far from the tine openings as possible (behind the waistline of each tine) before you proceed.


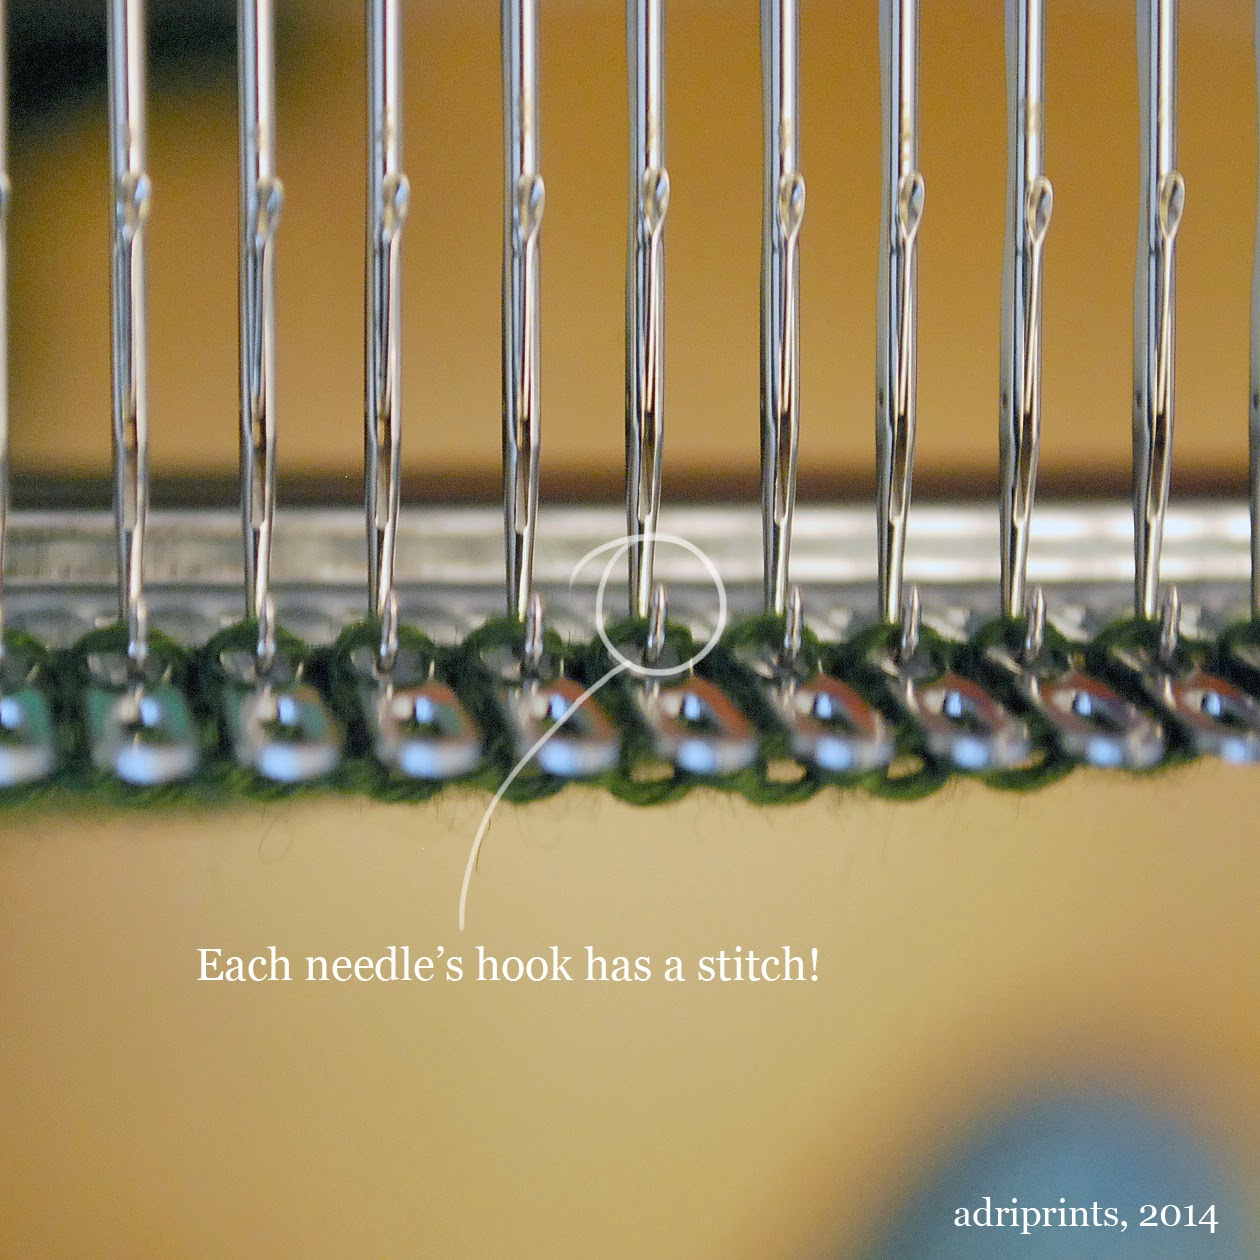
9. Push down gently on the garter bar, and slide it toward you.  Keep the garter bar as even with the needles as possible.  Here's the magical part... Each needle's hook should catch the underside of a single stitch.


Check the needles from above.  Every needle has a stitch?  Yay!  You're ready to move on!


10.  Replace the yarn in the carriage.  Remove the garter bar. Remove the needle guard.  Push the sts back into working position. Replace the weights on your knitting and knit 1 row in garter stitch!


Phew!  You did it!


Rinse and repeat as necessary.

Name That Vineyard Snippet (Part 2) …

100_4867  #1

100_4899  #2

DSC_0016  #3

DSC_0234  #4

DSC_0242  #5

DSC_0255  #6

DSC_0315  #7

DSC_0337  #8

DSC_0348  #9

 Leave a comment If you know where these pictures are and what they’re of !

If you don’t know the Vineyard but are curious about these pictures then come back in a few days and see the full sized photos.

:)


Wild West Vol 1, Lace 1: Diamondback Cowl

Oh hai!  Yes, tSUNSET CAT-7he Diamondback Cowlone of two cowl patterns in the The Wild West: Patterns Inspired by the Flora, Fauna, Geology & History of Arizona, vol 1: Lace 1, is the cover pattern for the e-book.

As I noted the on the previous post, I met Kim of Indigodragonfly at Sock Summit 2011.  She is still wonderful and sweet and funny.  She gave me this gorgeous merino silk yarn after I promised NOT  to hug her and squeeze her and call her George.

ROMANCE

This cowl features lace, beading and a tiny bit of cabling in the top and bottom edging.

See the rattles in the edging?

PATTERN NOTES

Stitch patterns are charted.

Note that the cable edging for the top and bottom edging doesn’t repeat evenly with each lace repeat; work its repeat separately.

The center panel is a modification of Mrs Montague from A Treasury of Knitting Patterns by Barbara Walker.

FINISHED MEASUREMENTS
Circumference: 18½in / 47cm
Height: 11in / 28cm

YARN
Indigo Dragonfly Merino Silk fingering, 50% merino/ 50% silk, (430 yds per 100g), approx ¾ skein, shown in My World is All Askew (Willow).

NEEDLES
US3 / 3¼mm needles or size to obtain gauge

GAUGE
1 repeat of Main Body of Cowl repeat, blocked = 2¾in / 7cm wide by 2in / 5cm tall

NOTIONS
(1) stitch marker; (50) 6-0 beads; crochet hook or dental floss for bead placement (I use a 0¾mm hook); yarn needle

SKILLS
knitting in the round, lace, provisional cast on & grafting, beading, cabling, reading charts

SUNSET CAT-9

Why read?

btt button

Why do YOU read fiction? Here’s one person’s answer.


Don’t forget to leave a link to your actual response (so people don’t have to go searching for it) in the comments—or if you prefer, leave your answers in the comments themselves!